Thursday, April 22, 2021

Create Node.js & Express.js with Typescript Project

    Here are the steps to create Node.js & Express.js with Typescript Project.

    1. Create a folder.
    2. Type command "npm init" to create package files.
    3. Type "npm install -g typescript" to install typescript.
    4. Type "tsc --init" to create typescript config file.
    5. Type "npm install express --save" to download express module.
    6. Type "npm install nodemon --save-dev" to download nodemon developer tool.
    7. Type "install install @types/node --save-dev" to download typescript node definition files.
    8. Type "install install @types/express --save-dev" to download typescript express definition files.
    9. Edit the package.json
    10. Change to main to "dist/app.js" to point to the start javascript file.
    11. Add the start scripts, "start" : "nodemon dist/app.js"
    12. The package.json will look like below:
    13. Edit the tsconfig.json
    14. Add "moduleResolution" : "node" under "module" : "commonjs".
    15. Change the "outDir" : "./dist". This is the location where typescript compiles the javascript.
    16. Change the "rootDir" : "./srv". This is where we store the typescript files.
    17. The tsconfig.json will look like below:
    18. Create /src folder and add app.ts. Edit the app.ts with the below script.
      import express from "express";

      const app = express();
      const port = process.env.port || 3001;

      // Adding middleway to use syntax req.body.name.
      app.use(express.json());

      app.get("/", (reqres=> res.send("Hello World!"));

      app.listen(port, () =>
        console.log(`Example app is listening on post ${port}!`)
      );

    19. Open a terminal run "npm start". This will start the web server using nodemon.
    20. Open another terminal run "tsc --watch". This will watch the /src folder to compile the ts to javascript.
    21. Call http://localhost:3001/ using postman. If you see "Hello World!", congratulation, you have completed the setup Node.js & Express.js with the Typescript project.

    Below is the project you may download from GitHub.

    Below GitHub is the example of the Node.js & Express.js project. You may compare the different of project setup.

    Friday, April 16, 2021

    Typescript: Shorthand Initialization

    In a lot of use cases, the fields are initialized in the constructor.

    class Person {

        // Fields declaration 
        name : string;
        private id : string;

        // Initial the field value in constructor
        constructor(name : stringid : string) { 
            this.name = name;
            this.id = id;
        }

    }

    You can simplify to

    class Person {

        constructor(private name : stringpublic id : string) {}

    }

    Typescript: Singleton

     Singleton is a design pattern that ensures that only one objects exits.

    /**
     * The Singleton class defines the `getInstance` method that lets clients access
     * the unique singleton instance.
     */
     class ExampleSingleton {
        private static instanceExampleSingleton;

        /**
         * The Singleton's constructor should always be private to prevent direct
         * construction calls with the `new` operator.
         */
        private constructor() { }

        /**
         * The static method that controls the access to the singleton instance.
         *
         * This implementation let you subclass the Singleton class while keeping
         * just one instance of each subclass around.
         */
        public static getInstance(): ExampleSingleton {
            if (!ExampleSingleton.instance) {
                ExampleSingleton.instance = new ExampleSingleton();
            }

            return ExampleSingleton.instance;
        }

        /**
         * Finally, any singleton should define some business logic, which can be
         * executed on its instance.
         */
        public someBusinessLogic() {
            // ...
        }
    }

    /**
     * The client code.
     */
    function clientCode() {
        const s1 = ExampleSingleton.getInstance();
        const s2 = ExampleSingleton.getInstance();

        if (s1 === s2) {
            console.log('Singleton works, both variables contain the same instance.');
        } else {
            console.log('Singleton failed, variables contain different instances.');
        }
    }

    clientCode();

    Singleton used case can be logging class where we can re-use the object.

    ES2019 Added Class Private Access Modifier

    ES2016 had introduced class without the access modified. Refer to my below article. 

    https://scalaoncloud.blogspot.com/2016/12/javascript-evolution-esmascript-6.html


    ES2019 has new Class Access Modified. You can add a private modified with # infont. For example:

    class SponsorWidget {
      constructor(namedescriptionurl) {
        this.name = name;
        this.description = description;
        this.url = url;
      }

      // Private method
      #buildURL(url) {
        console.log(url);
      }

      render() {
        // Calling private method
        this.#buildURL(this.url);
      }
    }

    // Here is how we involve the class
    let sponsorWidget = new SponsorWidget(
      "Google",
      "Search",
      "https://www.google.com"
    );
    sponsorWidget.render();

    // Error throw.
    sponsorWidget.#buildURL("https://www.hotmail.com");

    Wednesday, April 7, 2021

    Why does Prettier not format code in VS Code?

    I was trying to set up Prettier in my VS Code and not sure why it does not format code. After googling I found the fix.

    1. Goto "VS Code > View > Command Palette".

    2. Search for "Format Document With".

    3. Click on "Configure Default Formatter".

    4. Click on "Prettier - Code Formatter".

    I had recommended "Indent Rainbow" on my previous blog on "What is your first VS Code plugin?". Well, this plugin is not that useful if you have Prettier. Prettier already indent your code and I don't need indent colour.

    Sunday, April 4, 2021

    Flatten array in MongoDb ($unwind) vs HCL Notes (View)

     Let's say you have an array dataset:

    [{

        "name": "Simon",

        "hobbies": ["badminton", "tennis"]

    },{

        "name": "Max",

        "hobbies": ["swimming", "tennis"]

    }]


    You can fatten the hobbies array to multiple documents using $unwind.


    db.hobby.aggregate([{$unwind : "$hobbies"}]).pretty()


    The result:

    [{

            "_id" : ObjectId("6066d4146fc1865ad270a066"),

            "name" : "Simon",

            "hobbies" : "badminton"

    },

    {

            "_id" : ObjectId("6066d4146fc1865ad270a066"),

            "name" : "Simon",

            "hobbies" : "tennis"

    },

    {

            "_id" : ObjectId("6066d42b6fc1865ad270a067"),

            "name" : "Max",

            "hobbies" : "swimming"

    },

    {

            "_id" : ObjectId("6066d42b6fc1865ad270a067"),

            "name" : "Max",

            "hobbies" : "tennis"

    }]


    Let produce the same data set in HCL Notes.


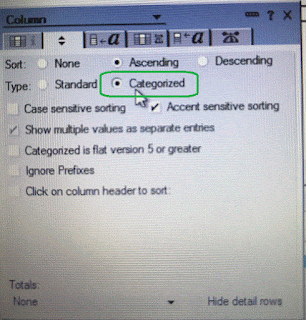
    In the columns property, set "Ascending" sort and check to "Show multiple values as separate entries".


    The result:


    After splitting the array data into a different document, we can group them to get to the sum. For example, we would like to get to the total number of each hobby. 

    In MongoDb, here is the query:

    db.hobby.aggregate([
    {$unwind : "$hobbies"},
    {$group: { _id : '$hobbies',count: { $sum: 1 }}}
    ]).pretty()

    The result:

    { "_id" : "badminton", "count" : 1 }
    { "_id" : "tennis", "count" : 2 }
    { "_id" : "swimming", "count" : 1 }

    In HCL Notes, category (group) the hobbies column. 


    Add a new column with below setting:


    The result: